Instructions for Firmware Downgrade (Returning firmware to a compatible version)
Affected Printer Models: - HP Color LaserJet Pro MFP M180NW
Before proceeding with firmware downgrade the printer settings need to be set to the following:
Allow Downgrade = YES
Check Automatically = OFF
Allow Updates = YES
The following are the steps through the printer menus to check/change settings.
For “Allow Downgrade” setting to be “Yes”:
Printers with a 2-line control panel:
- Use the right arrow to scroll to “Service” and then select “OK”
- Use the right arrow to scroll to “LaserJet Update” and then select “OK”
- Use the right arrow to scroll to “Manage Updates” and then select “OK”
- Use the right arrow to scroll to “Allow Downgrade” and then select “OK”
- Use the right arrow to scroll to “Yes” and then select “OK”
Printers with a touchscreen control panel:
- From the Home screen scroll to and select “Setup”
- Scroll to and select “Service” menu
- Scroll to and select “LaserJet Update"
- Press ‘Next’ to clear the message
- Select “Manage Updates”
- Select “Allow Downgrade”
- Select “Yes”
For “Check Automatically” setting to be “Off":Printers with a 2-line control panel:
Continuing in “Manage Updates” where left off after “Allow Downgrade” in prior section:
- Use the right arrow to scroll to “Check Automatically” and then select “OK”
- Use the right arrow to scroll to “Off” and then select “OK”
Printers with a touchscreen control panel:
Continuing in “Manage Updates” where left off after “Allow Downgrade” in prior section:
- Select “Manage Updates”
- Select “Check Automatically”
- Select “Off”
For “Allow Updates” setting to be “Yes”:
Printers with a 2-line control panel:
Continuing in “Manage Updates” where left off after “Check Automatically” in prior section:
- Use the right arrow to scroll to “Allow Updates” and then select “OK”
- Use the right arrow to scroll to “Yes” and then select “OK”
Printers with a touchscreen control panel: Continuing in “Manage Updates” where left off after “Check Automatically” in prior section:
- Select “Allow Updates”
- Select “Yes”
Once you have the proper printer settings proceed to the firmware downgrade procedure.
Firmware File
Firmware downgrade procedure:
Step 1: Download and save onto your desktop the firmware file (.exe) for your printer model. See link above.
Step 2: Double-click on the .exe file saved on your desktop.
Step 3: Click on “Run” in the security warning pop-up.
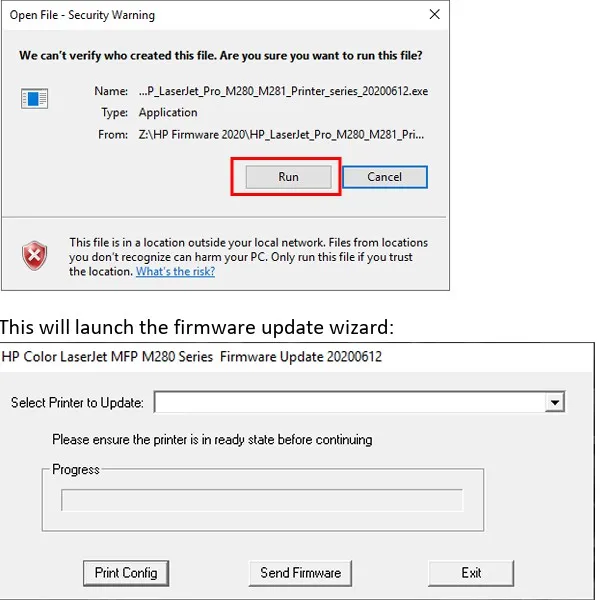
Note: The printer does not need to be in a “Ready State” to perform the firmware downgrade.
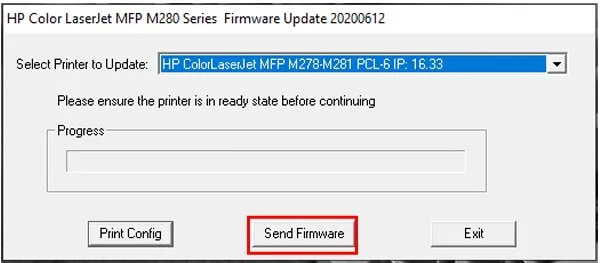
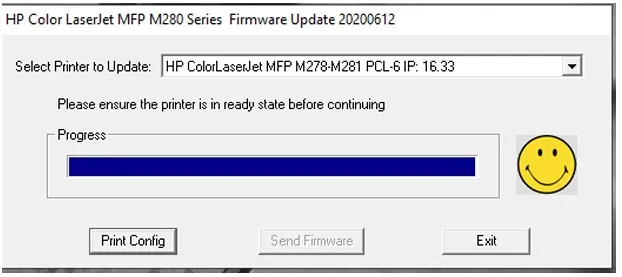
Step 4: In the drop-down menu, select the printer having the error. Next click on “Send Firmware”
 Step 5:
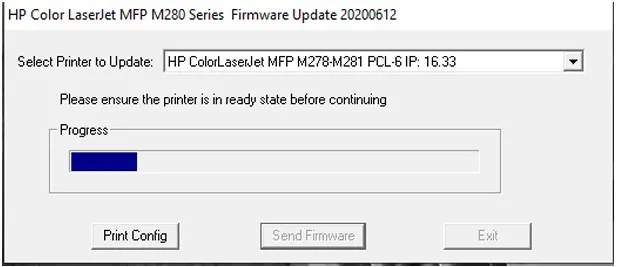
 During the firmware update, the progress bar will increase. This will take a few minutes.
On printer display will show “Programming…” during firmware update; for example:
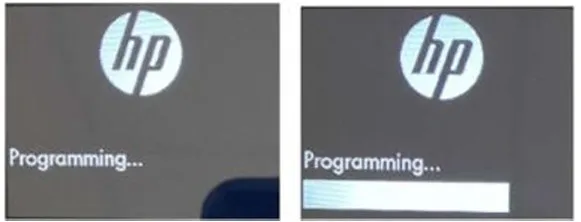
If firmware update is not proceeding for “Progress” and “Programming” status then see Troubleshooting section below.
Step 6: Once the firmware downgrade is completed, a happy face will appear indicating the firmware has successfully been installed.
Once completed the printer will restart.
Note: If have screen shot above and printer connected by Ethernet did not update then check IP address is correct for printer. Once IP is correctly set the printer may update without need to re-run the program.
Step 7: Change “Allow Updates” setting to “No”
For “Allow Updates” setting to be “No”:
Printers with a 2-line control panel:
- Use the right arrow to scroll to “Service” and then select “OK”
- Use the right arrow to scroll to “LaserJet Update” and then select “OK”
- Use the right arrow to scroll to “Manage Updates” and then select “OK”
- Use the right arrow to scroll to “Allow Updates” and then select “OK”
- Use the right arrow to scroll to “No” and then select “OK”
- Press return arrow button multiple times to return to Home screen
Printers with a touchscreen control panel:
- From the Home screen scroll to and select “Setup”
- Scroll to and select “Service” menu
- Scroll to and select “LaserJet Update”
- Press ‘Next’ to clear the message Select “Manage Updates”
- Select “Allow Updates”
- Select “No”
- Press Home button to return to Home screen
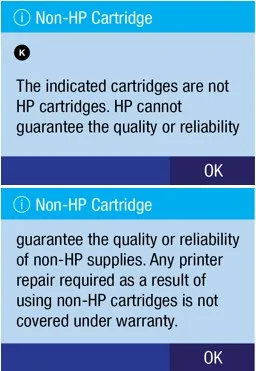
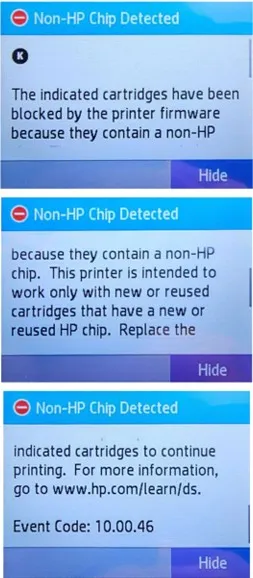
Troubleshooting – Still getting “Supplies Problem” Message?
- Make sure the firmware is being updated to the correct printer selected (see Step 4 above)
- Check the firmware file downloaded matches the printer model.
-
Firmware for HP Color LaserJet Pro MFP M180NW
Check printer settings:
Manage Updates Menu:
Allow Downgrade = YES
Check Automatically = OFF
Allow Updates = YES
- For Ethernet connected printer check settings are correct (IP address, Gateway and Subnet).
- If both of above are verified to be correct (downloaded file matches printer model and printer settings) then proceed with printer factory reset (“Restore Defaults”):
- For Network connected printer record the network IP address, Gateway and Subnet before proceeding with “Restore Defaults”
- For USB connected printer proceed directly with “Restore Defaults”
Restore Defaults: Printers with a 2-line control panel:- Use the right arrow to scroll to “Service” and then select “OK”
- Use the right arrow to scroll to “Restore Defaults” and then select “OK”
Printers with a touchscreen control panel:- From the Home screen scroll to and select “Setup”
- Scroll to and select “Service” menu
- Scroll to and select “Restore Defaults”
- Select “OK”
Once the printer has been restored, follow the instructions from the start to reset the printer settings before proceeding with firmware downgrade again


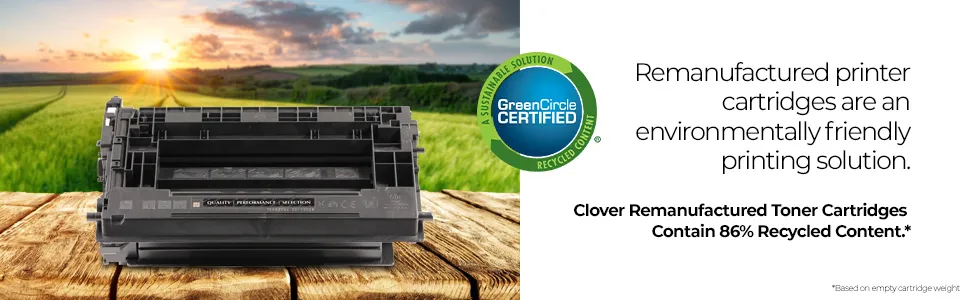
 Recycled Content Certified
 Low-Emission Toner